<?xml version="1.0" encoding="utf-8"?><feed xmlns="http://www.w3.org/2005/Atom" ><generator uri="https://jekyllrb.com/" version="3.10.0">Jekyll</generator><link href="https://nf-software-inc.github.io/feed.xml" rel="self" type="application/atom+xml" /><link href="https://nf-software-inc.github.io/" rel="alternate" type="text/html" /><updated>2026-06-30T15:03:58+00:00</updated><id>https://nf-software-inc.github.io/feed.xml</id><title type="html">NF Software Inc.</title><subtitle>Technical articles, design notes, and insights from NF Software.</subtitle><entry><title type="html">Microsoft 365 Advanced Security Guide</title><link href="https://nf-software-inc.github.io/2026/06/30/microsoft-365-advanced-security-guide/" rel="alternate" type="text/html" title="Microsoft 365 Advanced Security Guide" /><published>2026-06-30T00:00:00+00:00</published><updated>2026-06-30T00:00:00+00:00</updated><id>https://nf-software-inc.github.io/2026/06/30/microsoft-365-advanced-security-guide</id><content type="html" xml:base="https://nf-software-inc.github.io/2026/06/30/microsoft-365-advanced-security-guide/"><![CDATA[<p><img src="/assets/images/microsoft-365-guide.png" alt="Header Image" /></p>

<h2 id="overview">Overview</h2>

<p>When it comes to IT security, the threat landscape has become an advanced, persistent, and dangerous problem to deal with. Microsoft 365 is no exception, there are constantly phishing, hacking, and ransomware attacks that are ongoing and widespread. If you think your organization is too small for anyone to care, think again!</p>

<p>There are a number of tips and techniques that are built into the Microsoft 365 platform to help in mitigating these problems. Some of which are included with basic licensing such as Microsoft 365 Business Standard and others of which require special licenses such as Microsoft Entra ID P1.</p>

<p>This article will help to secure your Microsoft 365 tenant using a mix of security hardening practices and user awareness improvements. Below are the main categories that this article covers.</p>

<ul>
  <li>Portal Branding &amp; Customization</li>
  <li>Edge &amp; Teams Customization</li>
  <li>Baseline Security Mode &amp; Conditional Access</li>
</ul>

<h3 id="portal-branding--customization">Portal Branding &amp; Customization</h3>

<h4 id="branding-overview">Branding Overview</h4>

<p><em>Why customize the portal with your brand and other changes?</em></p>

<p>I mean sure, it looks a little nicer, but does it really matter? This is where the user awareness comes into play. With the level of sophistication we are seeing these days with phishing attacks, combined with a busy day for the average employee, even multifactor authentication secured accounts are being breached.</p>

<p>How does this happen? First, your employee will receive an email with a link they probably should know better than to click, but they’re swamped with deadlines and it looks real, so they click it and before they realize what has happened they have entered their username, password, and a 6-digit MFA code. This has just provided the attacker with a 30-second window to log into their account, and as long as the session is kept alive by clicking a link every now and then, it can silently remain as a dormant breach while data is being harvested and plans are made for the real attack.</p>

<p>Long story short, yes, branding and customization can increase security. It takes a generic sign-in page and transforms it into <strong><em>your company sign-in page</em></strong>. Now when your team goes to log into Microsoft 365 services they will see your logo and your colours, which are instantly recognizable. With proper training, the team will also know that anything else is wrong.</p>

<h4 id="branding-requirements">Branding Requirements</h4>

<ul>
  <li>Favicon, 32x32px</li>
  <li>Background image, 1920x1080px</li>
  <li>Square logo, 240x240px</li>
  <li>Rectangular logo, 200x48px</li>
  <li>3 colours</li>
  <li>Custom company domain (optional)</li>
</ul>

<h4 id="branding-steps">Branding Steps</h4>

<p><strong>Create Domain Redirect</strong></p>

<p>This one is optional and will differ a little depending on your domain registrar. Again, this increases user awareness. Simply add a URL redirect for your company domain to the primary domain in your Microsoft 365 tenant. You can choose whatever you would like but I typically go with <strong>portal</strong> as the prefix so it feels familiar.</p>

<p>portal.mycompany.com =&gt; https://myapps.microsoft.com/mycompany.com</p>

<p><strong>Create a Custom Company Theme</strong></p>

<p>In the Microsoft 365 admin center:</p>

<ul>
  <li>Click <strong>Show all</strong></li>
  <li>Click <strong>Settings -&gt; Org settings -&gt; Organization Profile -&gt; Custom themes</strong></li>
  <li>Then either click <strong>+ Add theme</strong> or <strong>… -&gt; Edit</strong> if there is an existing theme</li>
  <li>Select your preferences on the <strong>General</strong> tab, I usually enable both</li>
  <li>Go to the <strong>Logos</strong> tab and upload your rectangular logo</li>
  <li>Go to the <strong>Colors</strong> tab and enter your company colours</li>
</ul>

<p><strong>Create a Custom Company Login Page</strong></p>

<p>In the Microsoft 365 admin center:</p>

<ul>
  <li>Click to open the <strong>Identity</strong> admin center</li>
  <li>Click on <strong>Entra ID -&gt; Custom branding -&gt; Edit</strong></li>
  <li>Select your favicon, background, and background colour, then click <strong>Next: Layout &gt;</strong></li>
  <li>Select your preferred layout and click <strong>Next: Header &gt;</strong>, I usually leave the defaults</li>
  <li>Add your rectangular logo if you enabled the header, then click <strong>Next: Footer &gt;</strong></li>
  <li>Select your preferred options and click <strong>Next: Sign-in form &gt;</strong></li>
  <li>Select your rectangular logo and square logo, then click <strong>Next: Review &gt;</strong></li>
  <li>Click <strong>Save</strong></li>
</ul>

<h3 id="edge--teams-customization">Edge &amp; Teams Customization</h3>

<h4 id="app-customization-overview">App Customization Overview</h4>

<p>Similar to the portal customization, Microsoft Edge and Teams can be customized to help unify the look and feel of those applications. Additionally, there are several security settings in Edge that can be implemented to improve your company security. That said, you will need to promote Microsoft Edge as the primary work browser (or for limited purpose devices such as kiosks this can be enforced as the only allowable browser).</p>

<h4 id="microsoft-edge-customization">Microsoft Edge Customization</h4>

<p>First, if you do not have groups set up, you will need to make one or two; I typically make one for users and another for devices.</p>

<p>In the Microsoft 365 admin center:</p>

<ul>
  <li>Click <strong>Show all</strong></li>
  <li>Click to open the <strong>Identity</strong> admin center</li>
  <li>Click on <strong>Entra ID -&gt; Groups -&gt; All groups</strong></li>
  <li>Click <strong>New group</strong></li>
  <li>Select <strong>Security</strong> as the Group type, enter a name, and select <strong>Assigned</strong> as the Membership type</li>
  <li>Click <strong>No members selected</strong>, then add users and devices to the group</li>
  <li>Click <strong>Create</strong></li>
</ul>

<p>Now you can start making the customizations to Microsoft Edge.</p>

<p>In the Microsoft 365 admin center:</p>

<ul>
  <li>Click <strong>Settings -&gt; Microsoft Edge -&gt; Configuration Policies</strong></li>
  <li>Then click <strong>+ Create policy</strong></li>
  <li>Enter a name such as <em>General Customizations</em> and select the target Platforms (I usually target all)</li>
  <li>Click <strong>Next</strong> until the final screen then click <strong>Review and save</strong></li>
  <li>Click to open the new policy</li>
  <li>On the <strong>Properties</strong> tab click <strong>Edit</strong> on the Assignments header</li>
  <li>Then click <strong>Select group</strong> and type in the name of the new group, then click <strong>Select</strong></li>
  <li>Save the policy and return to the <strong>Properties</strong> tab and click <strong>Edit</strong> on the Settings header</li>
  <li>For each of the following click <strong>+ Add setting</strong> and type in the name
    <ul>
      <li>AllowGamesMenu =&gt; Disabled, no user override</li>
      <li>AllowSurfGame =&gt; Disabled, no user override</li>
      <li>AutoImportAtFirstRun =&gt; Disabled, no user override</li>
      <li>BingAdsSuppression =&gt; Enabled, no user override</li>
      <li>EnhanceSecurityMode =&gt; Balanced mode, no user override</li>
      <li>ForceBingSafeSearch =&gt; Moderate, no user override</li>
      <li>ForceGoogleSafeSearch =&gt; Enabled, no user override</li>
      <li>ForceYouTubeRestrict =&gt; Moderate, no user override</li>
      <li>GamerModeEnabled =&gt; Disabled, no user override</li>
      <li>HideFirstRunExperience =&gt; Enabled, no user override</li>
      <li>HomepageIsNewTabPage =&gt; Enabled, allow user override</li>
      <li>NewTabPageHideDefaultTopSites =&gt; Enabled, no user override</li>
      <li>NewTabPageManagedQuickLinks =&gt; Add up to 3 links here, allow user override</li>
      <li>NewTabPageQuickLinksEnabled =&gt; Enabled, no user override</li>
      <li>NewTabPageSetFeedType =&gt; Office 365, allow user override</li>
      <li>PasswordExportEnabled =&gt; Disabled, no user override</li>
      <li>ScarewareBlockerProtectionEnabled =&gt; Enabled, no user override</li>
      <li>ShowDownloadsInsecureWarningsEnabled =&gt; Enabled, no user override</li>
      <li>SmartScreenEnabled =&gt; Enabled, no user override</li>
      <li>ThirdPartyPasswordManagersAllowed =&gt; Enabled, no user override</li>
      <li>WalletDonationEnabled =&gt; Disabled, no user override</li>
    </ul>
  </li>
</ul>

<p>Also consider the following settings carefully, I would recommend using a password manager tool such as Passbolt or Bitwarden as they are far more secure than the browser-based password managers. One problem is that if an account is compromised, the attacker could export saved passwords from Microsoft Edge if the passwords are synced.</p>

<ul>
  <li>ImportPasswordsDisabled =&gt; Enabled, no user override</li>
  <li>ImportSavedPasswords =&gt; Disabled, no user override</li>
  <li>PasswordManagerEnabled =&gt; Disabled, no user override</li>
</ul>

<p>Finally, there is some branding for Microsoft Edge and additional security settings.</p>

<ul>
  <li>Save the policy and go to the <strong>Customization Settings</strong> tab</li>
  <li>Click into <strong>Organization branding</strong></li>
  <li>Select to <strong>Use custom branding</strong></li>
  <li>Enter the Organization name, Accent color, and Organization logo (square)</li>
  <li>Click <strong>Security settings</strong></li>
  <li>Enable the <strong>Configure enhanced security mode</strong> box and select <strong>Balanced</strong></li>
</ul>

<h3 id="microsoft-edge-web-content-filtering">Microsoft Edge Web Content Filtering</h3>

<p>This section requires one of a Microsoft 365 A1, A3, A5 license, a Business Premium license, or a Business Basic or Standard license with Intune Plan 1 or 2. This can also be done in the Defender portal depending on licensing but it is much simpler in the main portal if your requirements are not too complex.</p>

<p>Also note, it is possible your tenant is not on the latest release and the <strong>Web content filtering</strong> tab will simply not be present. If this is the case and you have the required licensing you may need to open a support case to request access.</p>

<p>For edge and limited use devices such as kiosks you may want to really lock things down. You can enable the web content filter which limits what content can be accessed via Microsoft Edge and enforces that Microsoft Edge is the only browser used.</p>

<p>In the Microsoft 365 admin center:</p>

<ul>
  <li>Click <strong>Show all</strong></li>
  <li>Go to <strong>Settings -&gt; Microsoft Edge -&gt; Configuration Policies</strong></li>
  <li>Either click to create a new policy or select an existing policy</li>
  <li>Click <strong>Customization Settings -&gt; Web content filtering</strong></li>
  <li>Select the categories to block and save the policy</li>
  <li>Additionally, you can manage allowed, blocked, and requested sites</li>
</ul>

<h3 id="microsoft-teams-customization">Microsoft Teams Customization</h3>

<p>This section requires a Microsoft Teams Premium license.</p>

<p>This is not really a security enhancement, but since the branding has already been rolled out across the portal and Edge it is a natural extension to continue here.</p>

<p>In the Microsoft 365 admin center:</p>

<ul>
  <li>Click <strong>Show all</strong></li>
  <li>Click to open the <strong>Teams</strong> admin center</li>
  <li>Go to <strong>Meetings -&gt; Customization policies -&gt; + Add a theme</strong></li>
  <li>Add a name</li>
  <li>Add the rectangular logo, and background image, and colour from earlier</li>
  <li>Click <strong>Apply</strong></li>
  <li>Click <strong>Save</strong></li>
</ul>

<h3 id="baseline-security-mode--conditional-access">Baseline Security Mode &amp; Conditional Access</h3>

<h4 id="security-settings-overview">Security Settings Overview</h4>

<p>While the first section focused on user awareness security improvements, and the second section focused on a mix of that and security hardening, this section focuses only on security hardening.</p>

<p>There are two parts to this section, Baseline Security Mode and Conditional Access. The former is part of every Microsoft 365 tenant and should be reviewed and updated, while the latter is a licensed option that is very much worth consideration.</p>

<h4 id="baseline-security-mode">Baseline Security Mode</h4>

<p>While there are a slew of different security settings and places to enable them in Microsoft 365, one that is included with all tenants is the Baseline Security Mode. This contains several key security recommendations related to authentication, file access, and Microsoft Office settings. The steps below outline how to get there and make changes, but there is also a lessor know URL that allows you to create custom policies and custom Microsoft Office installers, along with some other handy tools <a href="https://config.office.com/officeSettings/">Office Settings Portal</a>.</p>

<p>In the Microsoft 365 admin center:</p>

<ul>
  <li>Click <strong>Show all</strong></li>
  <li>Go to <strong>Settings -&gt; Org settings -&gt; Security &amp; privacy</strong></li>
  <li>Then click <strong>Baseline security mode</strong></li>
  <li>In the popout
    <ul>
      <li>You can initiate generating reports to view usage of related policies</li>
      <li>You can click to enable one or both of the default policy sets</li>
      <li>Or click to <strong>Open Baseline security mode</strong></li>
    </ul>
  </li>
  <li>In the Baseline security mode window
    <ul>
      <li>You can review generated usage reports</li>
      <li>Enable individual policies</li>
      <li>Click <strong>Customize this policy</strong> to make adjustments</li>
    </ul>
  </li>
</ul>

<p>You will need to review the policies to see if there are any apps accessing these protocols or modes. Sometimes other systems such as backup systems or third-party cloud services may be authenticating with an older method.</p>

<h4 id="authentication-methods">Authentication Methods</h4>

<p>Before diving into the security settings, it’s worth looking at multifactor-authentication methods and configuring them to improve overall security.</p>

<p>The methods are:</p>

<ul>
  <li>Temporary Access Pass</li>
  <li>Voice call</li>
  <li>Email OTP</li>
  <li>SMS</li>
  <li>Software OATH tokens</li>
  <li>Hardware OATH tokens</li>
  <li>Microsoft Authenticator</li>
  <li>QR Code</li>
  <li>Verified ID</li>
  <li>Certificate-based authentication</li>
  <li>Passkey (FIDO2)</li>
</ul>

<p>These include 3 strength categories that will help with the Conditional Access policies, those being: MFA, Passwordless MFA, and Phishing-resistant MFA. Each of which is successively higher strength. Full details at <a href="https://learn.microsoft.com/en-us/entra/identity/authentication/concept-authentication-strengths">Microsoft Learn</a>.</p>

<p>One key difference between these are that a regular MFA, and even Paswordless MFA, method are still subject to Man-In-The-Middle attacks and MFA Fatigue attacks, whereas Phishing-resistant MFA is very tough to bypass. Practically speaking, what does this mean though?</p>

<p>Basically, with regular MFA, if a code is provided to someone over the phone or entered into a malicious website, the attacker then has up to 30 seconds to use it to log in and establish a session; or for passwordless MFA, if an attacker has acquired the users’ password and sends one or more push notifications, one of which gets accepted, they can establish a session. But with phishing-resistant MFA, the user has a physical token they need to use for logging in.</p>

<blockquote>
  <p>Note that while the enforcement of particular MFA methods is part of the Conditional Access which requires additional licensing, all of the MFA methods are allowed on every tenant.</p>
</blockquote>

<h4 id="conditional-access">Conditional Access</h4>

<p>This section requires a Microsoft Entra ID P1 or P2 license.</p>

<p>Conditional Access is a set of policies that allow governing access to your tenant based on a variety of different factors such as geographic location, requested resources, device type, user account or group, and risk policy (P2 only). You can also configure what type of sign-ins are allowed or blocked and combine this with session expiry durations. Combined, these can significantly increase security with little to no perceived increase in user requirements.</p>

<p>You will need to customize things to your own organization, but the set of policies below can be a good starting point in many cases.</p>

<p>First, if you do not already have them, create two “break glass” accounts that will be assigned the Global Administrator role for the entire Microsoft 365 tenant. This is <strong><u>extremely important</u></strong> so you do not accidentally lock yourself out and also a standard practice recommended by Microsoft. I would recommend configuring both accounts with phishing-resistant MFA such as a YubiKey and storing the account passwords somewhere safe such as a password management system or even in a company safe. These accounts should only be used if all other accounts are inaccessible.</p>

<p>Next, groups should be created to target the policies to.</p>

<p>In the Microsoft 365 admin center:</p>

<ul>
  <li>Click <strong>Show all</strong></li>
  <li>Click to open the <strong>Identity</strong> portal</li>
  <li>Click <strong>Groups -&gt; All groups -&gt; New group</strong></li>
  <li>Leave the <strong>Group type</strong> as <strong>Security</strong></li>
  <li>Enter a <strong>Group name</strong></li>
  <li>Leave <strong>Membership type</strong> as <strong>Assigned</strong></li>
  <li>Repeat as required</li>
  <li>Suggested are <em>Conditional Access Admins</em>, <em>Conditional Access Users</em>, and <em>Conditional Access Travel</em></li>
</ul>

<p>Then, creating Named locations to target policies.</p>

<ul>
  <li>Click <strong>Conditional Access -&gt; Named locations -&gt; Countries location</strong></li>
  <li>Check off any countries your organization operates within</li>
  <li>Click <strong>Create</strong></li>
  <li>Then create another and select all countries your organization is not in</li>
  <li>Be sure to click <strong>Include unknown countries/regions</strong></li>
  <li>If you have static IP addresses create one or more <strong>IP ranges location</strong></li>
  <li>Provide a <strong>Name</strong>, check the <strong>Mark as trusted location</strong> box</li>
  <li>Enter any static IP addresses for the organization</li>
</ul>

<p>And finally, creating the policies.</p>

<ul>
  <li>Click <strong>Conditional Access -&gt; Policies -&gt; New policy from template</strong></li>
  <li>Click the <strong>Block legacy access</strong> policy template</li>
  <li>Click <strong>Review + create</strong></li>
  <li>Return to the policy screen and click to add a <strong>New policy</strong></li>
  <li>Use the tables below to create policies as required</li>
  <li>Leave policies at <strong>Report-only</strong> to start</li>
  <li>Change to <strong>On</strong> after a few days have gone by and reviewing the report data</li>
</ul>

<p>Review each of these to make sure it fits with how your organization operates. The main concept here is that most attacks come from out of country, so the heaviest restrictions are placed there; whereas the fewest attacks come from in the office, so the least restrictions are placed there.</p>

<p><strong>Admin – In Country</strong></p>

<p>Action: Grant access</p>

<table>
  <thead>
    <tr>
      <th> </th>
      <th>Include</th>
      <th>Exclude</th>
    </tr>
  </thead>
  <tbody>
    <tr>
      <td>Users</td>
      <td>Application Administrator<br />Authentication Administrator<br />Billing Administrator<br />Cloud Application Administrator<br />Conditional Access Administrator<br />Dynamics 365 Administrator<br />Dynamics 365 Business Central Administrator<br />Exchange Administrator<br />Global Administrator<br />Helpdesk Administrator<br />Intune Administrator<br />Password Administrator<br />Privileged Authentication Administrator<br />Privileged Role Administrator<br />Security Administrator<br />SharePoint Administrator<br />Teams Administrator<br />User Administrator<br />Windows 365 Administrator</td>
      <td>Break glass accounts</td>
    </tr>
    <tr>
      <td>Resources</td>
      <td>Microsoft Admin Portals</td>
      <td> </td>
    </tr>
    <tr>
      <td>Network</td>
      <td>In-country IPs</td>
      <td>In-office static IPs</td>
    </tr>
    <tr>
      <td>Platforms</td>
      <td> </td>
      <td> </td>
    </tr>
    <tr>
      <td>App Types</td>
      <td> </td>
      <td> </td>
    </tr>
  </tbody>
</table>

<p>MFA Requirements: Phishing-resistant MFA.<br />
Session Length: 4 hours</p>

<p><strong>Admin – In Office</strong></p>

<p>Action: Grant access</p>

<table>
  <thead>
    <tr>
      <th> </th>
      <th>Include</th>
      <th>Exclude</th>
    </tr>
  </thead>
  <tbody>
    <tr>
      <td>Users</td>
      <td>Application Administrator<br />Authentication Administrator<br />Billing Administrator<br />Cloud Application Administrator<br />Conditional Access Administrator<br />Dynamics 365 Administrator<br />Dynamics 365 Business Central Administrator<br />Exchange Administrator<br />Global Administrator<br />Helpdesk Administrator<br />Intune Administrator<br />Password Administrator<br />Privileged Authentication Administrator<br />Privileged Role Administrator<br />Security Administrator<br />SharePoint Administrator<br />Teams Administrator<br />User Administrator<br />Windows 365 Administrator</td>
      <td>Break glass accounts</td>
    </tr>
    <tr>
      <td>Resources</td>
      <td>Microsoft Admin Portals</td>
      <td> </td>
    </tr>
    <tr>
      <td>Network</td>
      <td>In-office static IPs</td>
      <td> </td>
    </tr>
    <tr>
      <td>Platforms</td>
      <td> </td>
      <td> </td>
    </tr>
    <tr>
      <td>App Types</td>
      <td> </td>
      <td> </td>
    </tr>
  </tbody>
</table>

<p>MFA Requirements: Standard MFA.<br />
Session Length: 4 hours</p>

<p><strong>Block – Admin – Out of Country</strong></p>

<p>Action: Block access</p>

<table>
  <thead>
    <tr>
      <th> </th>
      <th>Include</th>
      <th>Exclude</th>
    </tr>
  </thead>
  <tbody>
    <tr>
      <td>Users</td>
      <td>Application Administrator<br />Authentication Administrator<br />Billing Administrator<br />Cloud Application Administrator<br />Conditional Access Administrator<br />Dynamics 365 Administrator<br />Dynamics 365 Business Central Administrator<br />Exchange Administrator<br />Global Administrator<br />Helpdesk Administrator<br />Intune Administrator<br />Password Administrator<br />Privileged Authentication Administrator<br />Privileged Role Administrator<br />Security Administrator<br />SharePoint Administrator<br />Teams Administrator<br />User Administrator<br />Windows 365 Administrator</td>
      <td>Break glass accounts</td>
    </tr>
    <tr>
      <td>Resources</td>
      <td>Microsoft Admin Portals</td>
      <td> </td>
    </tr>
    <tr>
      <td>Network</td>
      <td>Global IPs</td>
      <td>In-office static IPs</td>
    </tr>
    <tr>
      <td>Platforms</td>
      <td> </td>
      <td> </td>
    </tr>
    <tr>
      <td>App Types</td>
      <td> </td>
      <td> </td>
    </tr>
  </tbody>
</table>

<p>MFA Requirements:<br />
Session Length:</p>

<p><strong>Block – Users – Out of Country</strong></p>

<p>Action: Block access</p>

<table>
  <thead>
    <tr>
      <th> </th>
      <th>Include</th>
      <th>Exclude</th>
    </tr>
  </thead>
  <tbody>
    <tr>
      <td>Users</td>
      <td>All users</td>
      <td>Break glass accounts<br />Conditional Access Travel</td>
    </tr>
    <tr>
      <td>Resources</td>
      <td>All resources</td>
      <td> </td>
    </tr>
    <tr>
      <td>Network</td>
      <td>Global IP</td>
      <td>In-office static IPs</td>
    </tr>
    <tr>
      <td>Platforms</td>
      <td> </td>
      <td> </td>
    </tr>
    <tr>
      <td>App Types</td>
      <td> </td>
      <td> </td>
    </tr>
  </tbody>
</table>

<p>MFA Requirements:<br />
Session Length:</p>

<p><strong>Block – Legacy Authentication</strong></p>

<p>Action: Block access</p>

<table>
  <thead>
    <tr>
      <th> </th>
      <th>Include</th>
      <th>Exclude</th>
    </tr>
  </thead>
  <tbody>
    <tr>
      <td>Users</td>
      <td>All users</td>
      <td>Break glass accounts</td>
    </tr>
    <tr>
      <td>Resources</td>
      <td>All resources</td>
      <td> </td>
    </tr>
    <tr>
      <td>Network</td>
      <td> </td>
      <td> </td>
    </tr>
    <tr>
      <td>Platforms</td>
      <td> </td>
      <td> </td>
    </tr>
    <tr>
      <td>App Types</td>
      <td>Exchange ActiveSync clients<br />Other clients</td>
      <td> </td>
    </tr>
  </tbody>
</table>

<p>MFA Requirements:<br />
Session Length:</p>

<p><strong>Users – In Country (Windows)</strong></p>

<p>Action: Grant access</p>

<table>
  <thead>
    <tr>
      <th> </th>
      <th>Include</th>
      <th>Exclude</th>
    </tr>
  </thead>
  <tbody>
    <tr>
      <td>Users</td>
      <td>All users</td>
      <td>Break glass accounts</td>
    </tr>
    <tr>
      <td>Resources</td>
      <td>All resources</td>
      <td> </td>
    </tr>
    <tr>
      <td>Network</td>
      <td>In-country IPs</td>
      <td>In-office static IPs</td>
    </tr>
    <tr>
      <td>Platforms</td>
      <td>Windows</td>
      <td> </td>
    </tr>
    <tr>
      <td>App Types</td>
      <td> </td>
      <td> </td>
    </tr>
  </tbody>
</table>

<p>MFA Requirements: One of Passwordless MFA or Microsoft Entra Hybrid joined device.<br />
Session Length: 14 days</p>

<p><strong>Users – In Office</strong></p>

<p>Action: Grant access</p>

<table>
  <thead>
    <tr>
      <th> </th>
      <th>Include</th>
      <th>Exclude</th>
    </tr>
  </thead>
  <tbody>
    <tr>
      <td>Users</td>
      <td>All users</td>
      <td>Break glass accounts<br />Directory Synchronization Accounts</td>
    </tr>
    <tr>
      <td>Resources</td>
      <td>All resources</td>
      <td> </td>
    </tr>
    <tr>
      <td>Network</td>
      <td>In-office static IPs</td>
      <td> </td>
    </tr>
    <tr>
      <td>Platforms</td>
      <td>Windows</td>
      <td> </td>
    </tr>
    <tr>
      <td>App Types</td>
      <td> </td>
      <td> </td>
    </tr>
  </tbody>
</table>

<p>MFA Requirements: Standard MFA or Microsoft Entra Hybrid joined device.<br />
Session Length: 90 days</p>

<p><strong>Users – In Country (Non-Windows)</strong></p>

<p>Action: Grant access</p>

<table>
  <thead>
    <tr>
      <th> </th>
      <th>Include</th>
      <th>Exclude</th>
    </tr>
  </thead>
  <tbody>
    <tr>
      <td>Users</td>
      <td>All users</td>
      <td>Break glass accounts</td>
    </tr>
    <tr>
      <td>Resources</td>
      <td>All resources</td>
      <td> </td>
    </tr>
    <tr>
      <td>Network</td>
      <td>In-country IPs</td>
      <td> </td>
    </tr>
    <tr>
      <td>Platforms</td>
      <td>Android<br />iOS<br />macOS<br />Linux</td>
      <td> </td>
    </tr>
    <tr>
      <td>App Types</td>
      <td> </td>
      <td> </td>
    </tr>
  </tbody>
</table>

<p>MFA Requirements: Passwordless MFA.<br />
Session Length: 14 days</p>

<p><strong>Users – Out of Country</strong></p>

<p>Action: Grant access</p>

<table>
  <thead>
    <tr>
      <th> </th>
      <th>Include</th>
      <th>Exclude</th>
    </tr>
  </thead>
  <tbody>
    <tr>
      <td>Users</td>
      <td>Conditional Access Travel</td>
      <td>Break glass accounts</td>
    </tr>
    <tr>
      <td>Resources</td>
      <td>All resources</td>
      <td> </td>
    </tr>
    <tr>
      <td>Network</td>
      <td>Global IP</td>
      <td>In-office static IPs</td>
    </tr>
    <tr>
      <td>Platforms</td>
      <td> </td>
      <td> </td>
    </tr>
    <tr>
      <td>App Types</td>
      <td> </td>
      <td> </td>
    </tr>
  </tbody>
</table>

<p>MFA Requirements: One of Phishing-resistant MFA or Microsoft Entry Hybrid joined device.<br />
Session Length: 1 day</p>

<h2 id="author">Author</h2>

<p><img src="https://github.com/thirstyape.png" alt="Nathanael Frey" width="48" style="border-radius: 50%;" />
<a href="https://github.com/thirstyape">Nathanael Frey</a></p>]]></content><author><name></name></author><category term="Security" /><category term="Microsoft 365" /><category term="security" /><category term="microsoft" /><category term="branding" /><category term="conditional access" /><category term="edge" /><category term="customization" /><category term="teams" /><summary type="html"><![CDATA[]]></summary></entry><entry><title type="html">Welcome to the NF Software Blog</title><link href="https://nf-software-inc.github.io/2026/05/19/welcome-to-the-nf-software-blog/" rel="alternate" type="text/html" title="Welcome to the NF Software Blog" /><published>2026-05-19T00:00:00+00:00</published><updated>2026-05-19T00:00:00+00:00</updated><id>https://nf-software-inc.github.io/2026/05/19/welcome-to-the-nf-software-blog</id><content type="html" xml:base="https://nf-software-inc.github.io/2026/05/19/welcome-to-the-nf-software-blog/"><![CDATA[<p>Hey! Thanks for stopping by.</p>

<p>This blog is a place to document and share practical experience from real-world software work.</p>

<p>If you’re looking for clear, direct explanations and working solutions to real problems, you’ll feel at home here.</p>

<h2 id="what-to-expect">What to Expect</h2>

<p>This blog will cover topics relevant to our work, including:</p>

<ul>
  <li>Software design and architecture</li>
  <li>Development practices and tooling</li>
  <li>Notes on open-source projects</li>
</ul>

<h2 id="why-this-exists">Why This Exists</h2>

<p>A lot of useful knowledge in software development never gets written down.</p>

<p>It lives in:</p>

<ul>
  <li>internal discussions</li>
  <li>one-off fixes</li>
  <li>hard-earned experience</li>
</ul>

<p>This blog exists to capture that knowledge in a way that is:</p>

<ul>
  <li><strong>Practical</strong> — directly usable</li>
  <li><strong>Precise</strong> — no unnecessary abstraction</li>
  <li><strong>Durable</strong> — still useful months or years later</li>
</ul>

<h2 id="feedback">Feedback</h2>

<p>If you have questions or related ideas, feel free to leave a comment below.</p>

<h2 id="author">Author</h2>

<p><img src="https://github.com/thirstyape.png" alt="Nathanael Frey" width="48" style="border-radius: 50%;" />
<a href="https://github.com/thirstyape">Nathanael Frey</a></p>]]></content><author><name></name></author><summary type="html"><![CDATA[Hey! Thanks for stopping by.]]></summary></entry><entry><title type="html">Setting Up BitLocker with YubiKey as Smart Card</title><link href="https://nf-software-inc.github.io/2021/01/09/bitlocker-yubikey-smart-card/" rel="alternate" type="text/html" title="Setting Up BitLocker with YubiKey as Smart Card" /><published>2021-01-09T00:00:00+00:00</published><updated>2021-01-09T00:00:00+00:00</updated><id>https://nf-software-inc.github.io/2021/01/09/bitlocker-yubikey-smart-card</id><content type="html" xml:base="https://nf-software-inc.github.io/2021/01/09/bitlocker-yubikey-smart-card/"><![CDATA[<p><img src="/assets/images/bitlocker-yubikey.jpg" alt="Header Image" /></p>

<h2 id="overview">Overview</h2>

<p>This guide provides steps to configure a BitLocker encrypted drive that can be unlocked with a YubiKey 5 series device in Smart Card mode. This will result in a BitLocker drive that is secured by a physical piece of hardware and only requires typing in your YubiKey PIN to unlock.</p>

<blockquote>
  <p><strong>2022-01-17 UPDATE:</strong> Step 7 has been updated to improve the completeness of configuring the YubiKey. This will be particularly helpful to anyone with multiple keys, but good for those without as well.</p>
</blockquote>

<h2 id="requirements">Requirements</h2>

<ul>
  <li>Windows 10 Professional (or higher)</li>
  <li>YubiKey 5 series (tested with 5Ci, 5C Nano, and 5 Nano)</li>
  <li>External drive, USB key, or virtual hard drive</li>
</ul>

<h2 id="configuration-steps">Configuration Steps</h2>

<h3 id="1-install-required-software">1. Install Required Software</h3>

<p>Download and install the YubiKey Manager, YubiKey Smart Card Minidriver, and optionally Yubico Authenticator apps.</p>

<ul>
  <li><a href="https://www.yubico.com/support/download/yubikey-manager/">YubiKey Manager</a></li>
  <li><a href="https://www.yubico.com/support/download/smart-card-drivers-tools/">YubiKey Smart Card Minidriver</a></li>
  <li>Yubico Authenticator: <a href="https://apps.microsoft.com/detail/9nfng39387k0">Windows 10</a>, <a href="https://play.google.com/store/apps/details?id=com.yubico.yubioath">Android</a>, <a href="https://apps.apple.com/ca/app/yubico-authenticator/id1476679808">iOS</a></li>
</ul>

<blockquote>
  <p>The authenticator app is not required for this guide, but it is useful for registering two-factor authentication (2FA) tokens to your YubiKey.</p>
</blockquote>

<h3 id="2-create-certificate-request">2. Create Certificate Request</h3>

<p>Create a text file with the following contents to use as a certificate request. I have set the certificate request to generate a certificate that is valid for 99 years; but you can change the <strong>ValidityPeriodUnits</strong> if a different amount of time is desired. You may also change the <strong>OID</strong> value, only do so if you have a reason for it. The name of the file does not matter, but I have used <strong>bitlocker-certificate.txt</strong>.</p>

<div class="language-ini highlighter-rouge"><div class="highlight"><pre class="highlight"><code><span class="nn">[NewRequest]</span>
<span class="py">Subject</span> <span class="p">=</span> <span class="s">"CN=BitLocker"</span>
<span class="py">KeyLength</span> <span class="p">=</span> <span class="s">2048</span>
<span class="py">HashAlgorithm</span> <span class="p">=</span> <span class="s">Sha256</span>
<span class="py">Exportable</span> <span class="p">=</span> <span class="s">TRUE</span>
<span class="py">KeySpec</span> <span class="p">=</span> <span class="s">"AT_KEYEXCHANGE"</span>
<span class="py">KeyUsage</span> <span class="p">=</span> <span class="s">"CERT_KEY_ENCIPHERMENT_KEY_USAGE"</span>
<span class="py">KeyUsageProperty</span> <span class="p">=</span> <span class="s">"NCRYPT_ALLOW_DECRYPT_FLAG"</span>
<span class="py">RequestType</span> <span class="p">=</span> <span class="s">Cert</span>
<span class="py">SMIME</span> <span class="p">=</span> <span class="s">FALSE</span>
<span class="py">ValidityPeriodUnits</span> <span class="p">=</span> <span class="s">99</span>
<span class="py">ValidityPeriod</span> <span class="p">=</span> <span class="s">Years</span>

<span class="nn">[EnhancedKeyUsageExtension]</span>
<span class="py">OID</span><span class="p">=</span><span class="s">1.3.6.1.4.1.311.67.1.1</span>
</code></pre></div></div>

<h3 id="3-enable-self-signed-certificates">3. Enable Self-Signed Certificates</h3>

<p>Open the Registry Editor and add the following key. Press <strong>Windows + R</strong>, then type in <strong>regedit</strong>, and click <strong>OK</strong> to open the Registry Editor.</p>

<ul>
  <li>Browse to: <strong>Computer\HKEY_LOCAL_MACHINE\SOFTWARE\Policies\Microsoft\FVE</strong></li>
  <li>Right-click in the window pane on the right and select: <strong>New -&gt; DWORD (32-bit) Value</strong></li>
  <li>Type the following name for the key: <strong>SelfSignedCertificates</strong></li>
  <li>Double-click the key to open it and set the value to: <strong>1</strong></li>
</ul>

<h3 id="4-configure-group-policy">4. Configure Group Policy</h3>

<p>Open the Local Group Policy Editor to ensure that smart card certificates are properly configured for use with BitLocker. To open the Local Group Policy Editor press <strong>Windows + R</strong>, then type <strong>gpedit.msc</strong>, and click <strong>OK</strong>.</p>

<ul>
  <li>Browse to: <strong>Local Computer Policy -&gt; Administrative Templates -&gt; Windows Components -&gt; BitLocker Drive Encryption</strong></li>
  <li>Double-click to open: <strong>Validate smart card certificate usage rule compliance</strong></li>
  <li>Set the rule to: <strong>Enabled</strong></li>
  <li>Ensure that the <strong>Object identifier</strong>: is set to <strong>1.3.6.1.4.1.311.67.1.1</strong> (or if you changed the <strong>OID</strong> in step 2 it must match that value)</li>
</ul>

<h3 id="5-generate-certificate">5. Generate Certificate</h3>

<p>Open PowerShell to generate the certificate to use with BitLocker and the YubiKey. This is the certificate that will be loaded onto the YubiKey.</p>

<ul>
  <li>Change directory to where you saved the text file from step 2</li>
  <li>Run the following command: <strong>certreq -new .\bitlocker-certificate.txt</strong></li>
  <li>Enter a name for the request file such as: <strong>bitlocker-certificate.req</strong></li>
  <li>Delete the <strong>.req</strong> file as it is not needed</li>
  <li>Delete the <strong>.txt</strong> file from step 2</li>
</ul>

<h3 id="6-export-certificate">6. Export Certificate</h3>

<p>Open the certificate manager to export the newly created certificate in a format that can be loaded on to the YubiKey.</p>

<ul>
  <li>Open the Windows start menu and type: <strong>Manage user certificates</strong></li>
  <li>Click to open the certificate manager program</li>
  <li>Browse to: <strong>Certificates – Current User -&gt; Personal -&gt; Certificates</strong></li>
  <li>There you will see a certificate titled BitLocker</li>
  <li>Right-click and select: <strong>All Tasks -&gt; Export…</strong></li>
  <li>Click <strong>Next</strong>, then select <strong>Yes, export the private key</strong>, then click <strong>Next</strong> again</li>
  <li>Click <strong>Next</strong>, then check the <strong>Password:</strong> box, and enter a password for the certificate (I used ‘1’ as this file will be deleted later anyhow)</li>
  <li>Click <strong>Next</strong>, then <strong>Browse…</strong> and save the file as <strong>bitlocker-certificate.pfx</strong>, then click Next, and finally <strong>Finish</strong></li>
</ul>

<h3 id="7-configure-the-yubikeys">7. Configure the YubiKey(s)</h3>

<p>Open the YubiKey Manager program to import the certificate to your YubiKey.</p>

<ul>
  <li>If not already done, insert your YubiKey into your PC</li>
  <li>Open the <strong>YubiKey Manager</strong> app</li>
  <li>Go to: <strong>Applications -&gt; PIV -&gt; Configure Certificates -&gt; Card Authentication</strong></li>
  <li>Click <strong>Import</strong> and browse to and select the <strong>bitlocker-certificate.pfx</strong> file</li>
  <li>Type the password you assigned to the certificate in step 6</li>
  <li>Check the <strong>Use default</strong> box on the Management key screen and click <strong>OK</strong></li>
  <li>Delete the <strong>bitlocker-certificate.pfx</strong> file from your PC (may want to wait until completely finished for this)</li>
</ul>

<p><strong>2022-01-17 UPDATE</strong></p>

<p>After further testing, I have found that it can be helpful to configure the PIN Management section of the YubiKey as well. This is primarily to ensure that configuring multiple keys works without issue, but should also ensure that your keys are set up in the most secure way. These additional steps will provide a standard configuration.</p>

<ul>
  <li>With the YubiKey Manager program still open go to: <strong>Applications -&gt; PIV -&gt; Configure PINs</strong></li>
  <li>If not already done, click <strong>Change PIN</strong> to update the PIN to something other than the default</li>
  <li>Then, from the <strong>Configure PINs</strong> screen, click <strong>Change PUK</strong></li>
  <li>Add a PUK that is different than your PIN, this is essentially your backup PIN</li>
  <li>Then, from the <strong>Configure PINs</strong> screen, click <strong>Change Management Key</strong></li>
  <li>Click <strong>Generate</strong>, and ensure the <strong>Protect with PIN</strong> box is checked</li>
  <li>Repeat this process on your other keys, be sure to copy the generated key to those keys</li>
</ul>

<p>Note that the management key should be the same on all of your keys and also kept secret. That is, only click Generate on the first YubiKey. If you would like to add another YubiKey in the future you will need to store this key as you cannot retrieve it. For further information on PIN management see the <a href="https://docs.yubico.com/yesdk/users-manual/application-piv/pin-puk-mgmt-key.html">YubiKey documentation</a>.</p>

<h3 id="8-enable-bitlocker-with-smart-card">8. Enable BitLocker with Smart Card</h3>

<p>Encrypt your device with the now configured YubiKey. Once this step is completed you will have an encrypted drive that can be unlocked with your YubiKey.</p>

<ul>
  <li>Connect your storage device to your PC</li>
  <li>Open <strong>File Explorer</strong> and go to <strong>This PC</strong></li>
  <li>Right-click on the device you would like to encrypt with BitLocker</li>
  <li>Click <strong>Turn on BitLocker</strong></li>
  <li>Check the <strong>Use my smart card to unlock the drive</strong> box and click <strong>Next</strong></li>
  <li>Select one of the options to backup your recovery key. This is important, as if you lose your YubiKey this will be the only way to unlock your drive</li>
  <li>Click <strong>Next</strong> and then select how much of your drive to encrypt. I typically select <strong>Encrypt entire drive (slower but best for PCs and drives already in use)</strong></li>
  <li>Click <strong>Next</strong> and then select which encryption mode to use. I typically select <strong>New encryption mode (best for fixed drives on this device)</strong></li>
  <li>Click <strong>Start encrypting</strong></li>
  <li>That’s it, you are now ready to unlock your encrypted drive with your YubiKey</li>
  <li>Remember to empty your <strong>Recycle Bin</strong> to permanently delete the certificates that were used during setup</li>
</ul>

<h3 id="9-verify-the-results">9. Verify the Results</h3>

<p>Verify that everything worked as expected. If for some reason things are not working remember that you can use the recovery key from the previous step to unlock the drive at any time.</p>

<ul>
  <li>Right-click on your device in <strong>File Explorer</strong> and select <strong>Eject</strong></li>
  <li>Remove the device and re-insert it into your PC</li>
  <li>Click on the device in <strong>File Explorer</strong> to bring up the BitLocker menu</li>
  <li>Click <strong>Use smart card</strong></li>
  <li>Enter the PIN you have set on your YubiKey (default is 123456, but I would highly suggest changing it)</li>
  <li>Your drive should now be unlocked</li>
</ul>

<h3 id="10-bonus-step---multiple-keys">10. Bonus Step - Multiple Keys</h3>

<p>If you are like me you may have a second YubiKey in case you lose one of them. The great news is that you can use more than one YubiKey to unlock the same device.</p>

<ul>
  <li>With the YubiKey you just configured inserted into your PC open the <strong>YubiKey Manager</strong> app</li>
  <li>Go to: <strong>Applications -&gt; PIV -&gt; Configure Certificates -&gt; Card Authentication</strong></li>
  <li>Click export and save the file as <strong>bitlocker-certificate.crt</strong></li>
  <li>Remove your first YubiKey from your PC and insert your second YubiKey</li>
  <li>Go to: <strong>Applications -&gt; PIV -&gt; Configure Certificates -&gt; Card Authentication</strong></li>
  <li>Click <strong>Import</strong> and browse to the <strong>.crt</strong> file that was just exported</li>
  <li>Check the <strong>Use default</strong> box and click OK</li>
  <li>Delete the <strong>bitlocker-certificate.crt</strong> file</li>
</ul>

<p>That’s all for setting up another YubiKey. Now you should be able to unlock your BitLocker drive with either key.</p>

<h2 id="author">Author</h2>

<p><img src="https://github.com/thirstyape.png" alt="Nathanael Frey" width="48" style="border-radius: 50%;" />
<a href="https://github.com/thirstyape">Nathanael Frey</a></p>

<h2 id="discussion-archived">Discussion (Archived)</h2>

<p>The following comments were migrated from the original blog and are preserved for reference. Legacy comments are read-only. Use live comments below for discussion.</p>

<blockquote>
  <h3 id="jr-says">JR says:</h3>
  <p><strong>2021-10-06 at 20:40</strong></p>

  <p>When trying to import the crt on the second yubikey, I’m getting an error “Could not deserialize key data”</p>

  <p>Any suggestions?</p>
</blockquote>

<blockquote>
  <blockquote>
    <h3 id="nathanael-frey-says">Nathanael Frey says:</h3>
    <p><strong>2021-11-29 at 20:17</strong></p>

    <p>Hi JR,</p>

    <p>Did you use the instructions in the Bonus Step section of this article? When you export your key from the YubiKey Manager it should be in the correct format for use with other YubiKeys. Also, did you make sure that you entered the password set in step 6 correctly?</p>

    <p>Not that this should make a difference, but which type of YubiKey are you using? I have tested this on 5Ci and 5NFC. As best I can tell anything in the 4 or 5 series should be ok. I see they have a few other products though.</p>

    <p>Nathanael</p>
  </blockquote>
</blockquote>

<blockquote>
  <h3 id="steve-le-says">Steve Le says:</h3>
  <p><strong>2021-10-13 at 02:19</strong></p>

  <p>Hi Nathanael,</p>

  <p>Thank you for a beautiful post. I’ve tried doing all your steps successfully but BitLocker said “A suitable certificate for BitLocker can’t be found on your SmartCard”.</p>

  <p>I’m using Windows 11. Any thoughts about fixing the problem? I’m looking forward to a resolution, digging my research on Google but failed miserably .</p>

  <p>Best regards,</p>

  <p>Steve</p>
</blockquote>

<blockquote>
  <blockquote>
    <h3 id="nathanael-frey-says-1">Nathanael Frey says:</h3>
    <p><strong>2021-11-29 at 20:06</strong></p>

    <p>Hi Steve,</p>

    <p>I did a bit of checking into BitLocker for Windows 11. Does not look like there have been any changes there, so that is likely not a factor.</p>

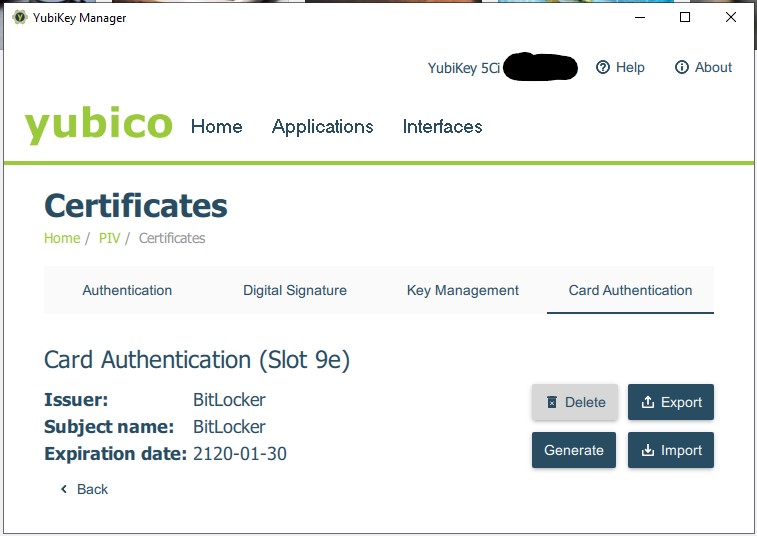
    <p>Sounds like either the certificate that was generated is not compatible with BitLocker or the certificate was not properly imported to the YubiKey. If the certificate was generated incorrectly, regenerating the certificate may work (steps 2, 5 to 7). The first time I tried getting things working I had to repeat the steps and that worked for whatever reason. I guess something must have been slightly off on my first attempt. If you used a different OID in steps 2 and 4 I would recommend using the one in the article (also recommended by <a href="https://learn.microsoft.com/en-us/previous-versions/windows/it-pro/windows-7/dd875530(v=ws.10)">Microsoft</a>). I have also posted a screenshot of what it looks like in my YubiKey Manager in the Certificates screen. You must use the Slot 9e certificate from everything I have found.</p>

    <p>Nathanael</p>

    <p><img src="/assets/images/yubikey-manager-screenshot.jpg" alt="Comment Image" /></p>
  </blockquote>
</blockquote>

<blockquote>
  <blockquote>
    <blockquote>
      <h3 id="enaske-says">Enaske says:</h3>
      <p><strong>2023-10-06 at 16:52</strong></p>

      <p>Same Error for me, might be a bit old.</p>

      <p>Followed the Guide 2 times also changed the Certificate that is used to encrypt drives in User Accounts because it was the wrong one, but still no luck.</p>

      <p>It says: No valid Smartcard found after entering the PIN for my Yubikey.</p>
    </blockquote>
  </blockquote>
</blockquote>

<blockquote>
  <blockquote>
    <blockquote>
      <blockquote>
        <h3 id="nathanael-frey-says-2">Nathanael Frey says:</h3>
        <p><strong>2024-09-30 at 17:39</strong></p>

        <p>Hi Enaske,</p>

        <p>I hope you figured things out, been a while since I checked the comments here.</p>

        <p>I have seen this when I had multiple devices in play. For example when setting things up between my desktop and laptop the second device gave me this error. I think I just needed to install the minidriver listed in step 1 to resolve; I suspect you have already done this. If you configured your YubiKey on another device I would suggest trying to configure BitLocker there too.</p>
      </blockquote>
    </blockquote>
  </blockquote>
</blockquote>

<blockquote>
  <h3 id="matt-says">matt says:</h3>
  <p><strong>2021-12-14 at 02:08</strong></p>

  <p>I’m skeptical that this method is actually based on PIV / Yubikey.</p>

  <p>If you are exporting the Private key and importing it into Windows then there is no point in having a PIV Smart Card.</p>

  <p>Is my understanding correct?</p>
</blockquote>

<blockquote>
  <blockquote>
    <h3 id="nathanael-frey-says-3">Nathanael Frey says:</h3>
    <p><strong>2021-12-14 at 09:47</strong></p>

    <p>Hi Matt,</p>

    <p>A valid concern, but not to worry, if you follow this guide the key will not reduce the security.</p>

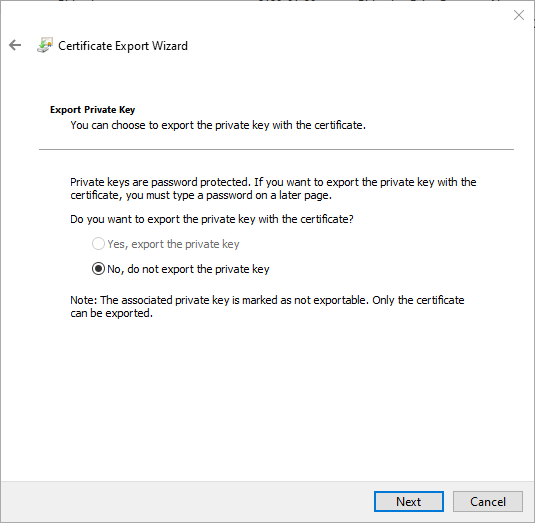
    <p>The private key is simply to verify the authenticity of your smart card (or in this case YubiKey). The actual authentication is part of the smart card system itself, so you still need to have a smart card with the key loaded. That said, if you were to export the private key and load it on to another YubiKey, that key could then be used to unlock your BitLocker drive. The important thing here is that when the key pair is imported into Windows, the private key is not marked as exportable. The method to import the key pair used in this guide does not allow exporting afterwards.</p>

    <p>This is also why I suggest in Step 7 to delete the .pfx file. Once that file is gone, you will not be able to export the private key (unless you allowed it via Windows or the YubiKey Manager during import there). To verify, you can type ‘Run’ into the start menu, then type MMC there, under File -&gt; Add/Remove Snap in…, add the Certificates snap-in and select My user account. Then under Certificates – Current User -&gt; Personal -&gt; Certificates you will find your BitLocker key. Right click it and select All Tasks -&gt; Export. If the private key can be exported you will likely want to reload the key on your system so that it cannot be exported. Should look like the screenshot below.</p>

    <p>Nathanael</p>

    <p><img src="/assets/images/certificate-export-screenshot.png" alt="Placeholder" /></p>
  </blockquote>
</blockquote>

<blockquote>
  <h3 id="mj-says">MJ says:</h3>
  <p><strong>2022-03-08 at 19:01</strong></p>

  <p>Thanks for the great post!</p>

  <p>Have you had any luck using ECC certificates for Bitlocker?</p>

  <p>I tried a few times myself but couldn’t get it to work. I have read some places that for some reason it’s not possible…</p>

  <p><a href="https://superuser.com/questions/1547656/why-cant-i-add-an-elliptic-curve-certificate-smartcard-yubikey-piv-as-prote">https://superuser.com/questions/1547656/why-cant-i-add-an-elliptic-curve-certificate-smartcard-yubikey-piv-as-prote</a></p>

  <p>Keep us posted if you achieve anything!</p>
</blockquote>

<blockquote>
  <h3 id="mike-says">Mike says:</h3>
  <p><strong>2022-05-20 at 12:50</strong></p>

  <p>Are there any articles out there for an admin to provision YubiKeys for domains users?</p>
</blockquote>

<blockquote>
  <blockquote>
    <h3 id="nathanael-frey-says-4">Nathanael Frey says:</h3>
    <p><strong>2022-06-23 at 10:18</strong></p>

    <p>Hi Mike,</p>

    <p>I talked with some people at yubico a while back on this topic and while they do have software to help with domain provisioning, it is only available with the <a href="https://www.yubico.com/products/yubikey-as-a-service/">YubiEnterprise</a> subscription service. That service has a minimum requirement of 750 users, so for small and medium companies it just is not affordable.</p>

    <p>During that call they did direct me to one of their partners <a href="https://www.authlite.com/">AuthLite</a>. In this case, we ended up giving their product a try and it is definitely something that I would recommend. Their product provides the ability to manage MFA for all domain users without the need to install additional software on client machines (just one lightweight app to install on Domain Controllers). Typically, just appending the MFA code to the username field is all that is required. This also works for integrated services such as VPNs (can confirm that Cisco AnyConnect works with AuthLite). Best of all, AuthLite will not break the budget!</p>

    <p>Nathanael</p>
  </blockquote>
</blockquote>

<blockquote>
  <h3 id="dominik-says">Dominik says:</h3>
  <p><strong>2022-05-26 at 15:22</strong></p>

  <p>Hey, very nice tutorial! I did not find FVE in step 3, so I created it myself. Bitlocker still says it cannot find a usable certificate.. I am guessing it is because of this? What could be the reason for the missing node?</p>
</blockquote>

<blockquote>
  <blockquote>
    <h3 id="nathanael-frey-says-5">Nathanael Frey says:</h3>
    <p><strong>2022-06-23 at 10:23</strong></p>

    <p>Hi Dominik,</p>

    <p>I am not sure why the FVE key would be missing; upon checking my current PC, I am also missing the FVE key. I would suggest to right-click on the <strong>Computer\HKEY_LOCAL_MACHINE\SOFTWARE\Policies\Microsoft</strong> and select <strong>New -&gt; Key</strong>. Then name this Key FVE. After this you will be able to perform step 3.</p>

    <p>Nathanael</p>
  </blockquote>
</blockquote>

<blockquote>
  <blockquote>
    <h3 id="fox-says">Fox says:</h3>
    <p><strong>2022-06-30 at 10:10</strong></p>

    <p>My FVE folder was missing as well, until I enabled the “Validate smart card certificate usage rule compliance” from step 4 that it showed up in the registry editor.</p>

    <p>I suggest enabling that and then going back to step 3 and continuing. Hope this helps!</p>
  </blockquote>
</blockquote>

<blockquote>
  <h3 id="marko-says">Marko says:</h3>
  <p><strong>2022-09-01 at 04:48</strong></p>

  <p>Thank you for this guide. It works on Windows 10 Pro and Windows 11 Pro for me as of Septemner 2022.</p>

  <p>I want to add that I lost quite a lot of time for error “A certificate suitable for BitLocker can’t be found on your smart card.”, and it’s most probably related to the fact that I initially did not install YubiKey Smart Card Minidriver. It is clearly written in the first step but I managed to ignore it on first attempt and then skipped over it as “already done” when reading again and again the instructions. Just writing this if it will save time to somebody else.</p>
</blockquote>

<blockquote>
  <h3 id="joseph-says">Joseph says:</h3>
  <p><strong>2022-11-23 at 23:00</strong></p>

  <p>I don’t get the option to” Use my smart card to unlock the drive” when turning on bitlocker for the system drive. Does this method not work for system drives? I can enable it for my other partition.</p>
</blockquote>

<blockquote>
  <blockquote>
    <h3 id="nathanael-frey-says-6">Nathanael Frey says:</h3>
    <p><strong>2022-11-24 at 14:23</strong></p>

    <p>Hi Joseph,</p>

    <p>BitLocker on boot drives can use one of the following to unlock: TPM chip, PIN, or password. As per <a href="https://learn.microsoft.com/en-us/windows/security/operating-system-security/data-protection/bitlocker/faq#can-bitlocker-support-smart-cards-for-pre-boot-authentication-">Microsoft documentation</a> smart cards are not supported for this situation.</p>
  </blockquote>
</blockquote>

<blockquote>
  <h3 id="trevor-case-says">Trevor Case says:</h3>
  <p><strong>2023-01-04 at 22:36</strong></p>

  <p>Just got a few yubikeys (5Ci) in and wanted to start utilizing them for things. In my case Step 3 and 4 were reversed. Once I completed Step 4 then the FVE directory in regedit appeared with the correct OID versioning.</p>

  <p>Thanks for the guide!</p>
</blockquote>

<blockquote>
  <h3 id="benjamin-phillips-says">Benjamin Phillips says:</h3>
  <p><strong>2023-03-10 at 10:19</strong></p>

  <p>Just a heads up, when you do the export process inside of the manage certificates section, I had to change the encryption to RSA or I’d get an out-of-index range error. Once this was exported with RSA it was able to be imported into my Yubikey</p>
</blockquote>

<blockquote>
  <h3 id="bill-bremer-says">Bill Bremer says:</h3>
  <p><strong>2023-12-20 at 19:29</strong></p>

  <p>After following these steps, would I be able to mount the encrypted drive on another, unmodified Windows Pro computer using the Yubikey? Would the other computer likely need configuration changes before I could unlock the drive?</p>
</blockquote>

<blockquote>
  <blockquote>
    <h3 id="nathanael-frey-says-7">Nathanael Frey says:</h3>
    <p><strong>2023-12-21 at 10:45</strong></p>

    <p>Hi Bill,</p>

    <p>You may need to install the YubiKey Smart Card Minidriver mentioned in Step 1 on the target machine. As for the Bitlocker requirements there should be no issue. Although, if memory serves correctly, I believe when I set up my current laptop I was able to unlock the drives without any extra setup.</p>
  </blockquote>
</blockquote>

<blockquote>
  <blockquote>
    <blockquote>
      <h3 id="bill-bremer-says-1">Bill Bremer says:</h3>
      <p><strong>2024-11-03 at 10:04</strong></p>

      <p>After installing the certificate on the Yubikey, can I then delete the certificate in the Windows certificate manager?</p>
    </blockquote>
  </blockquote>
</blockquote>

<blockquote>
  <blockquote>
    <blockquote>
      <blockquote>
        <h3 id="nathanael-frey-says-8">Nathanael Frey says:</h3>
        <p><strong>2024-12-22 at 18:42</strong></p>

        <p>Yes, you can delete the certificate after everything is set up. The public portion of the key will be added back whenever you unlock the drive, but that’s not a concern.</p>
      </blockquote>
    </blockquote>
  </blockquote>
</blockquote>

<blockquote>
  <h3 id="pawel-says">Pawel says:</h3>
  <p><strong>2024-01-12 at 08:19</strong></p>

  <p>What should I do if, in accordance with Step 3, I do not see the ‘FVE’ folder in the location ‘Computer\HKEY_LOCAL_MACHINE\SOFTWARE\Policies\Microsoft\FVE’ (while I am also unable to create it, as the system indicates that it already exists), and the computer is operating in a Windows domain?</p>
</blockquote>

<blockquote>
  <blockquote>
    <h3 id="nathanael-frey-says-9">Nathanael Frey says:</h3>
    <p><strong>2024-01-28 at 14:26</strong></p>

    <p>Hi Pawel,</p>

    <p>If your PC is on a domain you would likely need to contact your IT administrator for help with this step.</p>

    <p>Or, if you have another PC available that you have administrative rights to, you could use that one for the configuration of the BitLocker drives (assuming it is not an internal drive on the PC in question). You can still use the domain PC to unlock the drives, just complete Step 1 so that the domain PC has the required drivers for the YubiKey.</p>

    <p>Nathanael</p>
  </blockquote>
</blockquote>

<blockquote>
  <blockquote>
    <blockquote>
      <h3 id="peter-says">Peter says:</h3>
      <p><strong>2025-01-10 at 08:55</strong></p>

      <p>Easy, just do step 4, then step 3. That sets up the FVE folder in the registry.</p>
    </blockquote>
  </blockquote>
</blockquote>

<blockquote>
  <h3 id="eden-says">Eden says:</h3>
  <p><strong>2024-04-04 at 12:00</strong></p>

  <p>Thanks for the guide! I followed the guide and it works perfect for an external usb drive. but i started using the guide to use it for my internal C drive. and it just doesnt work. When i click on turn on bitlocker the window with “Use my smart card to unlock the drive” just doesnt appear. It just skips right to the window where you save the key. How can i fix this?</p>
</blockquote>

<blockquote>
  <blockquote>
    <h3 id="nathanael-frey-says-10">Nathanael Frey says:</h3>
    <p><strong>2024-04-04 at 13:08</strong></p>

    <p>Hi Eden,</p>

    <p>I do not believe that using a YubiKey as the unlocker for the operating system drive is currently possible using the options built into Windows. For operating system drives you can do one or both of TPM or boot PIN. There are 3rd party software products such as DriveLock and Cryptware listed on the Yubico website that can do this; although it is likely none of these are free.</p>
  </blockquote>
</blockquote>

<blockquote>
  <h3 id="valentin-says">Valentin says:</h3>
  <p><strong>2024-08-19 at 08:04</strong></p>

  <p>Thanks for the guide!</p>

  <p>I am trying to create a PowerShell-Script that automatically creates and encrypts VHDX-drives with BitLocker, I want to be able to use a Yubikey to unlock them. To add the Certificate I am using its thumbprint and the manage-bde command (manage-bde -protectors -add X: -certificate -ct THUMBPRINT), but for some reason I always get the same error Code 0x80310074. Do you have an idea on how this can be fixed?</p>
</blockquote>

<blockquote>
  <blockquote>
    <h3 id="nathanael-frey-says-11">Nathanael Frey says:</h3>
    <p><strong>2024-09-30 at 17:36</strong></p>

    <p>Hi Valentin,</p>

    <p>Are you able to complete step 8 using File Explorer? Looking at the <a href="https://learn.microsoft.com/en-us/windows/win32/secprov/protectkeywithcertificatethumbprint-win32-encryptablevolume">Microsoft Documentation</a> I see that it notes FVE_E_POLICY_USER_CERT_MUST_BE_HW, Group Policy requires that you supply a smart card to use BitLocker, as the error you note. To me this would suggest that one of the prior steps in the article may still need to be completed.</p>

    <p>When you go to enable it through File Explorer or Control Panel you should receive a prompt for your YubiKey when selecting the smart card option.</p>

    <p>Your command line looks good to me though, good idea.</p>
  </blockquote>
</blockquote>

<blockquote>
  <h3 id="bill-bremer-says-2">Bill Bremer says:</h3>
  <p><strong>2024-11-03 at 19:26</strong></p>

  <p>I tried your Bonus Step to Export / Import the certificate from one Yubikey to another with Yubikey Manager. The Export / Import went without error but when I try using the new Yubikey with Bitlocker it says it can’t find a smart card.</p>

  <p>Doing an import of the .pfx file to the new Yubikey results in a Yubikey that works with Bitlocker.</p>

  <p>Is there a trick to making the Yubikey Manager only method work?</p>
</blockquote>

<blockquote>
  <h3 id="michael-campbell-says">Michael Campbell says:</h3>
  <p><strong>2025-02-18 at 13:03</strong></p>

  <p>You mentioned “Yubico Authenticator app” can be used but I don’t see anywhere in your instructions on how to set that up with Bitlocker?????</p>
</blockquote>

<blockquote>
  <blockquote>
    <h3 id="nathanael-frey-says-12">Nathanael Frey says:</h3>
    <p><strong>2025-03-09 at 12:35</strong></p>

    <p>As noted, the authenticator app is not required, just nice to have. Although it looks like more recent versions can manage certificate stuff too; haven’t tested but it could be a replacement for the manager app.</p>
  </blockquote>
</blockquote>

<blockquote>
  <h3 id="michael-campbell-says-1">Michael Campbell says:</h3>
  <p><strong>2025-02-19 at 11:13</strong></p>

  <p>I’m dual booting Linux and Windows. In Windows I followed your instructions in setting up Yubikey smart card certificate and was able to unlock the Bitlocker drive using the PIN nbr. In Linux, I couldn’t unlock the Bitlocker drive in Linux using the same PIN nbr from Windows/Bitlocker. I would have to add a password in Windows/Bitlocker to achieve this but I rather use the PIN. Is it possible to export the certificate in Linux to install it somewhere? Are there instructions for dual booting with Bitlocker?</p>
</blockquote>

<blockquote>
  <blockquote>
    <h3 id="nathanael-frey-says-13">Nathanael Frey says:</h3>
    <p><strong>2025-03-09 at 12:36</strong></p>

    <p>How are you accessing BitLocker on Linux to begin with? I was not aware there was any form of support as this is a Windows technology.</p>
  </blockquote>
</blockquote>

<blockquote>
  <h3 id="bill-bremer-says-3">Bill Bremer says:</h3>
  <p><strong>2025-11-06 at 21:03</strong></p>

  <p>Now that the GUI version of YubiKey Manager is being discontinued, there may come a time when we can no longer use the Manager software to import directly from a pfx file into YubiKey Slot 9e.</p>

  <p>I understand that openSSL allows conversion of a pfx file into two .pem files that can then be imported to YubiKey using the ykman CLI software.</p>

  <p>Does anyone have any direct experience with this method or know of another method that works without YubiKey Manager?</p>
</blockquote>

<blockquote>
  <h3 id="emanuele-ranucci-says">Emanuele Ranucci says:</h3>
  <p><strong>2026-03-07 at 13:35</strong></p>

  <p>“First of all, thank you for the tutorial! I followed all the steps, including the 2022-01-17 UPDATE and the BONUS section, because I want my second YubiKey (I have two YubiKey 5 NFCs, one with firmware 5.7 and one with 5.4) to be used as a smart card for all BitLocker-encrypted devices.</p>

  <p>However, after completing all the steps, I’ve encountered a problem: when I attempt to unlock a BitLocker drive and the system prompts for the PIN of the second YubiKey, I receive the error ‘No valid Smartcard found’ immediately after entering the PIN.</p>

  <p>It is worth noting that I am configuring this second YubiKey on the exact same device that I used to successfully configure the first one. Any advice on why the second key isn’t being recognized despite following the same procedure?”</p>
</blockquote>]]></content><author><name></name></author><category term="Security" /><category term="BitLocker" /><category term="YubiKey" /><category term="bitlocker" /><category term="yubikey" /><category term="smart-card" /><category term="windows" /><category term="security" /><summary type="html"><![CDATA[]]></summary></entry></feed>